Qnap 配置iSCSI 并关联Lun
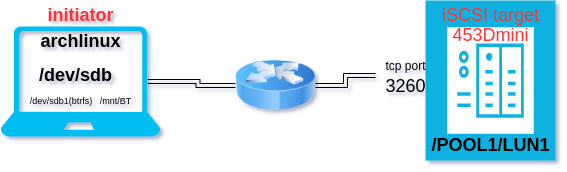
登陆Qnap管理界面,按照配置向导创建iSCSI target, 并创建新的Lun进行关联,设置开启或者不开启CHAP验证。
可以参考如下图片理解:https://www.cnblogs.com/f-ck-need-u/p/9067906.html
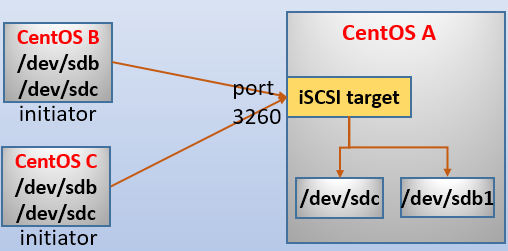
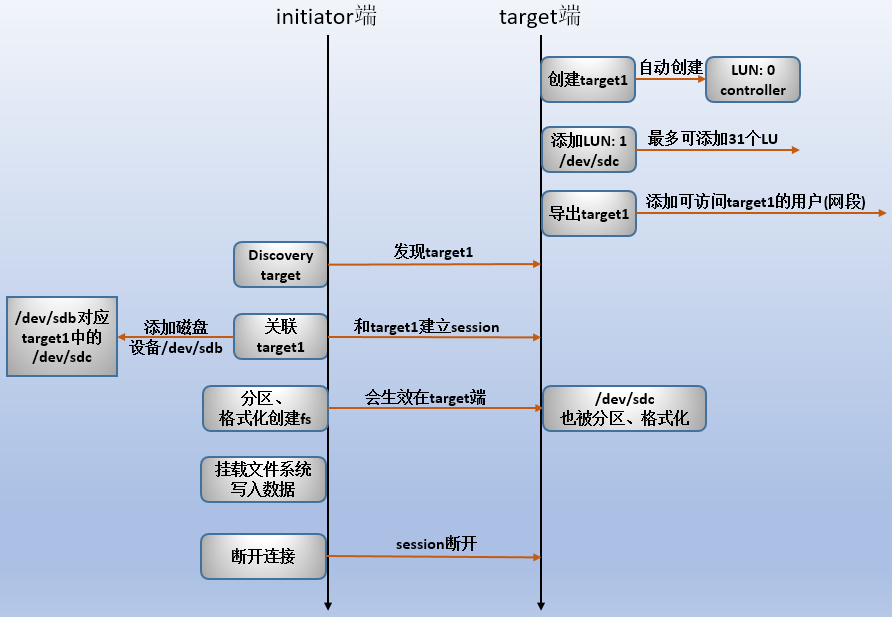
archlinux安装open-iscsi
安装iscsi软件包
1
sudo pacman -S open-iscsi开启iscsi服务
1
sudo systemctl enable --now iscsid.service开启iscsi自动登陆服务
1
sudo systemctl enable --now iscsi.service #注意少一个iscsi 少一个darchlinux 配置open-iscsi
发现iscsi
1
sudo iscsiadm --mode discovery --portal 192.168.100.99 --type sendtargets如下是发现的目标
1
2
3
4
5
10.0.5.1:3260,1 iqn.2004-04.com.qnap:ts-453dmini:iscsi.453d.589093
192.168.100.99:3260,1 iqn.2004-04.com.qnap:ts-453dmini:iscsi.453d.589093
10.0.3.1:3260,1 iqn.2004-04.com.qnap:ts-453dmini:iscsi.453d.589093
10.0.7.1:3260,1 iqn.2004-04.com.qnap:ts-453dmini:iscsi.453d.589093修改配置文件
1
2
cd /etc/iscsi/
sudo vim /etc/iscsi/iscsid.conf1
2
3
4
5
6
7
8
9
10
11
12
13
14
15
16
17
18
19
20
21
22
23
24#Authentication
#If the ISCSI target requires authentication by the initiator, the #configuration file /etc/iscsi/iscsid.conf may need to be updated.
#The following parameters are used for authenticating a login session of an initiator to a target:
node.session.auth.authmethod = CHAP #注销这一行启用CHAP验证
node.session.auth.username = initiators_username #这里填写NAS上设置的CHAP用户名
node.session.auth.password = initiators_password #这里填写NAS上设置的CHAP密码
#If your target has two-way authentication enabled then those lines also #need to be edited:
#node.session.auth.username_in = targets_username
#node.session.auth.password_in = targets_password
#If your target requires authentication to get the list of its nodes (most #will not) then following lines should be edited:
#discovery.sendtargets.auth.authmethod = CHAP
#discovery.sendtargets.auth.username = initiators_username
#discovery.sendtargets.auth.password = initiators_password
#If your target has two-way authentication enabled then those lines also #need to be edited:
#discovery.sendtargets.auth.username_in = targets_username
#discovery.sendtargets.auth.password_in = targets_password
#Warning: No two passwords may be the same. This means that you need four #unique passwords in the configuration above.登陆iscsi
1
sudo iscsiadm -m node -T iqn.2004-04.com.qnap:ts-453dmini:iscsi.453d.589093 -p 192.168.100.99:3260 -l1
2Logging in to [iface: default, target: iqn.2004-04.com.qnap:ts-453dmini:iscsi.453d.589093, portal: 192.168.100.99,3260]
Login to [iface: default, target: iqn.2004-04.com.qnap:ts-453dmini:iscsi.453d.589093, portal: 192.168.100.99,3260] successful.检查登陆成功的iscsi session
1
sudo iscsiadm -m session -P 31
2
3
4
5
6
7
8
9
10
11
12
13
14
15
16
17
18
19
20
21
22
23
24
25
26
27
28
29
30
31
32
33
34
35
36
37
38
39
40
41
42
43
44
45
46
47
48
49
50
51
52$ sudo iscsiadm -m session -P 3
iSCSI Transport Class version 2.0-870
version 2.1.6
Target: iqn.2004-04.com.qnap:ts-453dmini:iscsi.453d.589093 (non-flash)
Current Portal: 192.168.100.99:3260,1
Persistent Portal: 192.168.100.99:3260,1
**********
Interface:
**********
Iface Name: default
Iface Transport: tcp
Iface Initiatorname: iqn.2016-04.com.open-iscsi:d97cb859dc3e
Iface IPaddress: 192.168.100.66
Iface HWaddress: default
Iface Netdev: default
SID: 11
iSCSI Connection State: LOGGED IN
iSCSI Session State: LOGGED_IN
Internal iscsid Session State: NO CHANGE
*********
Timeouts:
*********
Recovery Timeout: 120
Target Reset Timeout: 30
LUN Reset Timeout: 30
Abort Timeout: 15
*****
CHAP:
*****
username: Mia
password: ********
username_in: <empty>
password_in: ********
************************
Negotiated iSCSI params:
************************
HeaderDigest: None
DataDigest: None
MaxRecvDataSegmentLength: 262144
MaxXmitDataSegmentLength: 262144
FirstBurstLength: 65536
MaxBurstLength: 262144
ImmediateData: Yes
InitialR2T: Yes
MaxOutstandingR2T: 1
************************
Attached SCSI devices:
************************
Host Number: 3 State: running
scsi3 Channel 00 Id 0 Lun: 0
Attached scsi disk sdb State: running1
2
3
4
5
6
7
8
9
10
11
12
13
14
15
16
17
18
19
20
21
22
23
24
25
26
27
28
29
30$ lsblk
NAME MAJ:MIN RM SIZE RO TYPE MOUNTPOINTS
sda 8:0 0 1.8T 0 disk
├─sda1 8:1 0 512M 0 part
├─sda2 8:2 0 30.5G 0 part
├─sda3 8:3 0 500G 0 part
├─sda4 8:4 0 500G 0 part
├─sda5 8:5 0 663G 0 part
└─sda6 8:6 0 169G 0 part
sdb 8:16 0 512G 0 disk #这就是刚刚连接上的iscsi硬盘
└─sdb1 8:17 0 512G 0 part #这是格式化为BTRFS的分区
mmcblk0 179:0 0 29.1G 0 disk
└─mmcblk0p1 179:1 0 29.1G 0 part
nvme0n1 259:0 0 465.8G 0 disk
├─nvme0n1p1 259:1 0 512M 0 part /boot
├─nvme0n1p2 259:2 0 32G 0 part [SWAP]
└─nvme0n1p3 259:3 0 433.3G 0 part /run/timeshift/backup
/var/lib/docker/btrfs
/var_log
/home
/.snapshots
/
nvme1n1 259:4 0 931.5G 0 disk
├─nvme1n1p1 259:5 0 600M 0 part
├─nvme1n1p2 259:6 0 236.6G 0 part
├─nvme1n1p3 259:7 0 302.7G 0 part
├─nvme1n1p4 259:8 0 202.3G 0 part
└─nvme1n1p5 259:9 0 189.3G 0 partsdb就是刚刚连接上的iscsi硬盘,相当一个新的硬盘,需要新建分区表(gpt/mbr),然后格式化为你需要的文件系统(ext4/btrfs/zfs/ntfs)
archlinux上格式化iscsi磁盘
Lun磁盘格式化,使用gpart或者命令fdisk格式化
archlinx-iscsi磁盘使用
主要是测试发送和接收btrfs 快照的,但是timeshift的快照是可写的无法发送。其他几个备份工具的子卷格式又不一样,罢了…
参考:
Looking for second opinions; timeshift vs snapper - btrfs
注销iscsi
如果需要注销iscsi登陆
1
sudo iscsiadm -m node -U allxxxx
附录:
在 QNAP 存储中,您无法使用 Web 界面更改或重置**iSCSI目标的密码。**您只能删除目标并重新创建它。当然,您将丢失目标中的所有数据。
幸运的是,密码以纯文本形式存储在**/etc/config/iscsi_trgt.conf文件的CHAPPPasswd**字段中。CHAP 用户也有字段。您可以使用 Putty 连接到设备并找到密码,而无需重置整个目标。更新:貌似改不了密码,密码字段是加密了的,不是原密码文本iscsi登陆后设置磁盘自动挂载:
设置自动挂载后会大幅增加开机时间
systemd.mount - Mount unit configuration
systemd.automount - Automount unit configuration
Using iSCSI volumes as mountable filesystems under CentOS 7
fstab与systemd.mount自动挂载的一点研究和见解
查看磁盘的uuid
1
lsblk -f得到iscsi磁盘uuid > mnt-xxx.mount.[mount].What
添加磁盘挂载单元
1
sudo vim /etc/systemd/system/mnt-BT.mount1
2
3
4
5
6
7
8
9
10
11
12
13
14lsof /mnt/BT[Unit]
Description=Mount iscsi at needed
#Before=remote-fs.target docker.service
After=iscsid.service #iscsid 启动后再启动这个单元
Requires=iscsid.service
[Mount]
What=/dev/disk/by-uuid/1d1c88fd-c7c9-4e0d-92f9-cd08cdac642c #使用uuid 来定位磁盘,避免盘符改变导致错误
Where=/mnt/BT
Type=btrfs
Options=_netdev,noauto # _netdev 表示是挂载的是网络设备,noauto选项不开机挂载,避免出错了无法开机。
[Install]
WantedBy=multi-user.target添加自动挂载单元
1
sudo vim /etc/systemd/system/mnt-BT.automount1
2
3
4
5
6
7
8
9[Unit]
Description=Automount BT
[Automount]
Where=/mnt/BT
#TimeoutIdleSec=5min
[Install]
WantedBy=multi-user.target创建完成后重载配置
1
sudo systemctl daemon-reload激活 automount 并加入开机启动项
1
sudo systemctl enable --now mnt-BT.mount mnt-BT.automout因为刚刚 /
mnt/BT已经手动挂载了,启动这两个单元会报错,查看日志journalctl -xe,lsof /mnt/BT查看那些进程使用了这个挂载点。退出使用的进程然后sudo umount /mnt/BT,然后重新启动这两个单元。
Qnap-iscsi-archlinux连接
文章目录